eline sağlıkWindows Üzerine Knight Online Pvp Server Kurulumu
Windows mimarisine sahip sunucularınıza (örneğin windows 7, 8, server 2008 gibi …) çok basit yöntemler ile knight online private server kurulumu yapabilirsiniz. sorumluları olarak sizler ve müşterilerimiz için bu anlatımı yapmayı uygun gördük. Knight online yapı itibariyle metin2 tipi sistemlere nazaran daha düşük işlemci tüketmektedir. Ancak elbette ram tüketimi benzerdir. Bu nedenlerle minimum 2 gb ramli bir sunucuda başlamanızı önerebiliriz.
knight online server files kurulumu dosyasını indirdikten sonra rar dan çıkarmayı unutmayınız!
:::::::::::::::: KURULUM ::::::::::::::::
Başlat -> Programlar -> Microsoft SQL Server 2008 (R2) -> SQL Server Management Studio şeklinde uygulamayı açıyoruz ;
Connect diyerek SQL server a bağlanıyoruz ;
Databases -> New Database tıklıyoruz ;
Database name : kn_online yazarak Ok diyoruz ;
İndirdiğimiz rar dosyasına ait klasörde /1886 Server Files adlı klasöre giriyoruz. Burada Oto-odbc çift tıklıyoruz ;
Evet diyoruz ;
Tamam diyoruz ;
Ardından C: sürücüsü altında /1886 database adlı klasör oluşturuyoruz ve içerisine db.bak ı yapıştırıyoruz ;
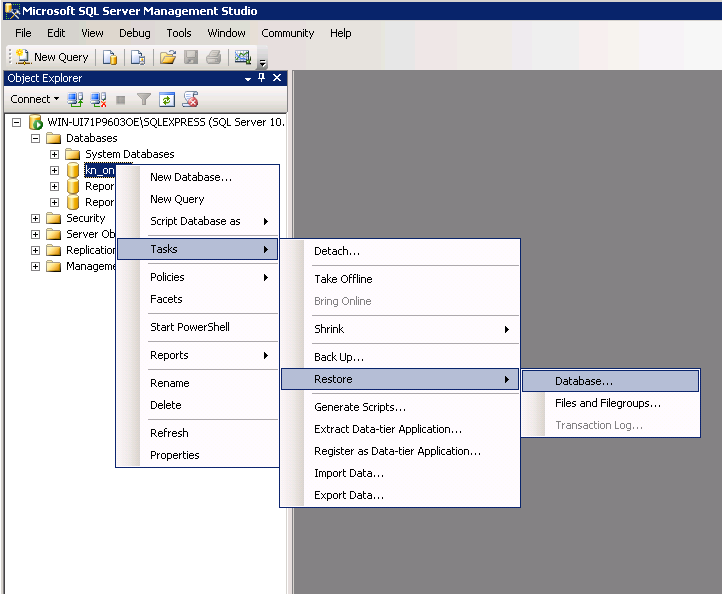
Yeniden SQL Server Management Studio ı açıyoruz ve kn_online -> Tasks -> Restore -> Database tıklıyoruz ;
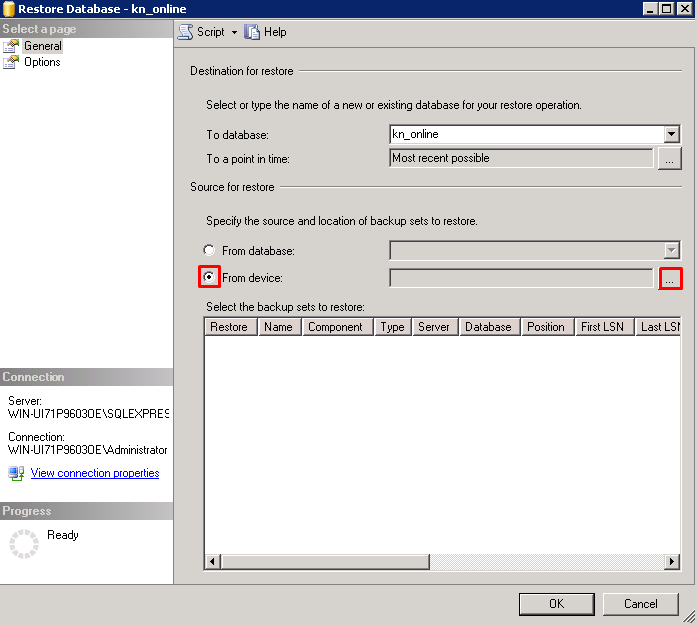
From device seçiyoruz ve işaretli yere tıklıyoruz ;
Add diyoruz ;
C: adltındaki /1886 database klasörü altından db.bak seçiyoruz Ok diyoruz ;
Ok diyoruz ;
Restore altındaki alanı seçiyoruz ;
Sol menüden options tıklıyoruz Overwrite the existing database seçiyoruz Ok diyoruz ;
Aktarma işlemi tamamlandı, Ok diyoruz ;
Veritabanı verileri sağlıklı görünüyor ;
İçeri aktarma işlemi şu an sağlıklı tamamlandı. Ancak Server Files ımızın veritabanına bağlanabilmesi için bazı uyumluluk ayarları yapmamız gerekiyor.
Bir üstte yer alan odbc kaynakları uyumluluk işlemini gerçekleştirdi iseniz şimdi /1886 Server Files/Files klasörüne giriyoruz ;
LogInServer.ini dosyasını metin editörü ile açıyoruz ;
URL ve Server_00 alanlarını sunucumuzun ip adresi ile değiştiriyoruz, dilersek işaretli kısımlarıda kendimize göre düzenliyoruz kaydediyoruz ;
LogInServer uygulamasını çift tıklayarak çalıştırıyoruz ;
AIServerçift tıklayarak çalıştırıyoruz ;
GameServer.ini dosyasını açıyoruz ve ip adreslerini kendi sunucu ip adreslerimize göre değiştirip kaydediyoruz ;
GameServer uygulamasını çalıştırıyoruz ;
Knight Online 1886 Server Files başarıyla çalıştırıldı.
Şimdi kişisel bilgisarımıza client dosyasını indirdiğimizi varsayalım. Kişisel bilgisayarımızdan knight online sunucumuza bağlanabilmek için /1886 Sorunsuz Client/ klasörü altında yer alan Server.ini yi açıyoruz ;
ip adresini kendi sunucu ip adresimiz ile değiştiriyoruz kaydediyoruz ;
Kişisel bilgisayarımızdan KnightOnLine.exe uygulamasını çalıştırıyoruz ;
Kullanıcı adı ve şifre ister ise;
kullanıcı adı : kn_online
şifre : ko123
Direkt olarak kurulu serverımıza bağlanıyoruz ;
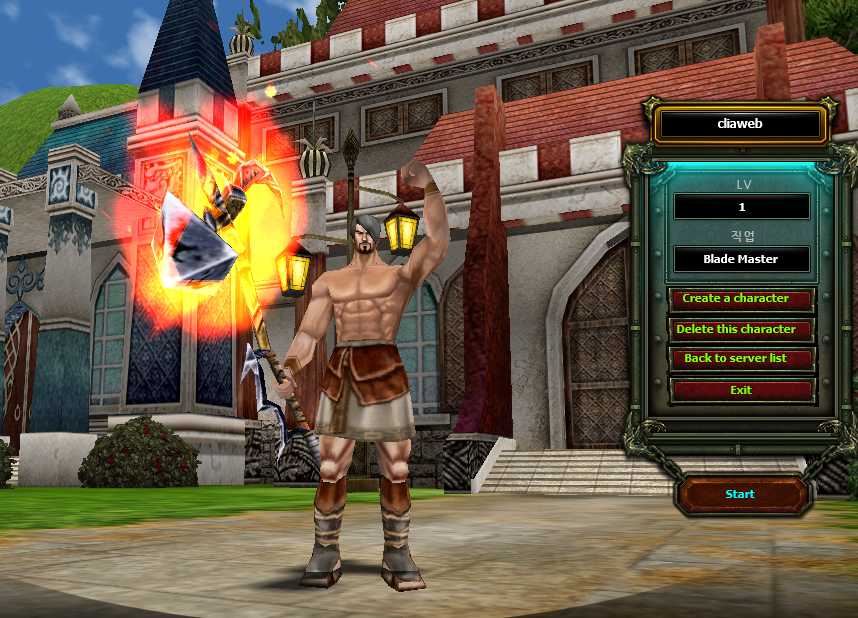
Bazı ekran görüntüleri ;
* Gizli metin: alıntı yapılamaz. *


33Windows Üzerine Knight Online Pvp Server Kurulumu
Windows mimarisine sahip sunucularınıza (örneğin windows 7, 8, server 2008 gibi …) çok basit yöntemler ile knight online private server kurulumu yapabilirsiniz. sorumluları olarak sizler ve müşterilerimiz için bu anlatımı yapmayı uygun gördük. Knight online yapı itibariyle metin2 tipi sistemlere nazaran daha düşük işlemci tüketmektedir. Ancak elbette ram tüketimi benzerdir. Bu nedenlerle minimum 2 gb ramli bir sunucuda başlamanızı önerebiliriz.
knight online server files kurulumu dosyasını indirdikten sonra rar dan çıkarmayı unutmayınız!
:::::::::::::::: KURULUM ::::::::::::::::
Başlat -> Programlar -> Microsoft SQL Server 2008 (R2) -> SQL Server Management Studio şeklinde uygulamayı açıyoruz ;
Connect diyerek SQL server a bağlanıyoruz ;
Databases -> New Database tıklıyoruz ;
Database name : kn_online yazarak Ok diyoruz ;
İndirdiğimiz rar dosyasına ait klasörde /1886 Server Files adlı klasöre giriyoruz. Burada Oto-odbc çift tıklıyoruz ;
Evet diyoruz ;
Tamam diyoruz ;
Ardından C: sürücüsü altında /1886 database adlı klasör oluşturuyoruz ve içerisine db.bak ı yapıştırıyoruz ;
Yeniden SQL Server Management Studio ı açıyoruz ve kn_online -> Tasks -> Restore -> Database tıklıyoruz ;
From device seçiyoruz ve işaretli yere tıklıyoruz ;
Add diyoruz ;
C: adltındaki /1886 database klasörü altından db.bak seçiyoruz Ok diyoruz ;
Ok diyoruz ;
Restore altındaki alanı seçiyoruz ;
Sol menüden options tıklıyoruz Overwrite the existing database seçiyoruz Ok diyoruz ;
Aktarma işlemi tamamlandı, Ok diyoruz ;
Veritabanı verileri sağlıklı görünüyor ;
İçeri aktarma işlemi şu an sağlıklı tamamlandı. Ancak Server Files ımızın veritabanına bağlanabilmesi için bazı uyumluluk ayarları yapmamız gerekiyor.
Bir üstte yer alan odbc kaynakları uyumluluk işlemini gerçekleştirdi iseniz şimdi /1886 Server Files/Files klasörüne giriyoruz ;
LogInServer.ini dosyasını metin editörü ile açıyoruz ;
URL ve Server_00 alanlarını sunucumuzun ip adresi ile değiştiriyoruz, dilersek işaretli kısımlarıda kendimize göre düzenliyoruz kaydediyoruz ;
LogInServer uygulamasını çift tıklayarak çalıştırıyoruz ;
AIServerçift tıklayarak çalıştırıyoruz ;
GameServer.ini dosyasını açıyoruz ve ip adreslerini kendi sunucu ip adreslerimize göre değiştirip kaydediyoruz ;
GameServer uygulamasını çalıştırıyoruz ;
Knight Online 1886 Server Files başarıyla çalıştırıldı.
Şimdi kişisel bilgisarımıza client dosyasını indirdiğimizi varsayalım. Kişisel bilgisayarımızdan knight online sunucumuza bağlanabilmek için /1886 Sorunsuz Client/ klasörü altında yer alan Server.ini yi açıyoruz ;
ip adresini kendi sunucu ip adresimiz ile değiştiriyoruz kaydediyoruz ;
Kişisel bilgisayarımızdan KnightOnLine.exe uygulamasını çalıştırıyoruz ;
Kullanıcı adı ve şifre ister ise;
kullanıcı adı : kn_online
şifre : ko123
Direkt olarak kurulu serverımıza bağlanıyoruz ;
Bazı ekran görüntüleri ;
* Gizli metin: alıntı yapılamaz. *
tesekkurlerWindows Üzerine Knight Online Pvp Server Kurulumu
Windows mimarisine sahip sunucularınıza (örneğin windows 7, 8, server 2008 gibi …) çok basit yöntemler ile knight online private server kurulumu yapabilirsiniz. sorumluları olarak sizler ve müşterilerimiz için bu anlatımı yapmayı uygun gördük. Knight online yapı itibariyle metin2 tipi sistemlere nazaran daha düşük işlemci tüketmektedir. Ancak elbette ram tüketimi benzerdir. Bu nedenlerle minimum 2 gb ramli bir sunucuda başlamanızı önerebiliriz.
knight online server files kurulumu dosyasını indirdikten sonra rar dan çıkarmayı unutmayınız!
:::::::::::::::: KURULUM ::::::::::::::::
Başlat -> Programlar -> Microsoft SQL Server 2008 (R2) -> SQL Server Management Studio şeklinde uygulamayı açıyoruz ;
Connect diyerek SQL server a bağlanıyoruz ;
Databases -> New Database tıklıyoruz ;
Database name : kn_online yazarak Ok diyoruz ;
İndirdiğimiz rar dosyasına ait klasörde /1886 Server Files adlı klasöre giriyoruz. Burada Oto-odbc çift tıklıyoruz ;
Evet diyoruz ;
Tamam diyoruz ;
Ardından C: sürücüsü altında /1886 database adlı klasör oluşturuyoruz ve içerisine db.bak ı yapıştırıyoruz ;
Yeniden SQL Server Management Studio ı açıyoruz ve kn_online -> Tasks -> Restore -> Database tıklıyoruz ;
From device seçiyoruz ve işaretli yere tıklıyoruz ;
Add diyoruz ;
C: adltındaki /1886 database klasörü altından db.bak seçiyoruz Ok diyoruz ;
Ok diyoruz ;
Restore altındaki alanı seçiyoruz ;
Sol menüden options tıklıyoruz Overwrite the existing database seçiyoruz Ok diyoruz ;
Aktarma işlemi tamamlandı, Ok diyoruz ;
Veritabanı verileri sağlıklı görünüyor ;
İçeri aktarma işlemi şu an sağlıklı tamamlandı. Ancak Server Files ımızın veritabanına bağlanabilmesi için bazı uyumluluk ayarları yapmamız gerekiyor.
Bir üstte yer alan odbc kaynakları uyumluluk işlemini gerçekleştirdi iseniz şimdi /1886 Server Files/Files klasörüne giriyoruz ;
LogInServer.ini dosyasını metin editörü ile açıyoruz ;
URL ve Server_00 alanlarını sunucumuzun ip adresi ile değiştiriyoruz, dilersek işaretli kısımlarıda kendimize göre düzenliyoruz kaydediyoruz ;
LogInServer uygulamasını çift tıklayarak çalıştırıyoruz ;
AIServerçift tıklayarak çalıştırıyoruz ;
GameServer.ini dosyasını açıyoruz ve ip adreslerini kendi sunucu ip adreslerimize göre değiştirip kaydediyoruz ;
GameServer uygulamasını çalıştırıyoruz ;
Knight Online 1886 Server Files başarıyla çalıştırıldı.
Şimdi kişisel bilgisarımıza client dosyasını indirdiğimizi varsayalım. Kişisel bilgisayarımızdan knight online sunucumuza bağlanabilmek için /1886 Sorunsuz Client/ klasörü altında yer alan Server.ini yi açıyoruz ;
ip adresini kendi sunucu ip adresimiz ile değiştiriyoruz kaydediyoruz ;
Kişisel bilgisayarımızdan KnightOnLine.exe uygulamasını çalıştırıyoruz ;
Kullanıcı adı ve şifre ister ise;
kullanıcı adı : kn_online
şifre : ko123
Direkt olarak kurulu serverımıza bağlanıyoruz ;
Bazı ekran görüntüleri ;
* Gizli metin: alıntı yapılamaz. *
Setting Up a Knight Online PvP Server on Windows
You can easily set up a Knight Online private server on your Windows-based servers (such as Windows 7, 8, Server 2008 , etc.). As the responsible parties, we deemed it appropriate to provide this explanation for you and our customers. Knight Online, by its nature, consumes less processor power than Metin2-type systems. However, RAM consumption is similar. For these reasons, we recommend starting with a server with a minimum of 2 GB of RAM.
After downloading the Knight Online server files installation file, don't forget to extract it from the RAR archive!
:::::::::::::::: SETUP ::::::::::::::::
We open the application by going to Start -> Programs -> Microsoft SQL Server 2008 (R2) -> SQL Server Management Studio ;
We connect to the SQL server by clicking Connect ;
We click on Databases -> New Database ;
We enter "Database name: kn_online " and click OK ;
Inside the folder containing the downloaded rar file, navigate to the folder named /1886 Server Files . There, double-click on Auto-odbc ;
Yes, we say;
Okay, we say;
Next, we create a folder named /1886 database under the C: drive and paste db.bak into it;
We reopen SQL Server Management Studio and click on kn_online -> Tasks -> Restore -> Database ;
We select "From device" and click on the marked area;
We say Add ;
We select db.bak from the /1886 database folder under C: and click OK ;
Okay, we say;
We select the area under Restore ;
From the left menu, click Options , select Overwrite the existing database, and click OK .
The transfer process is complete , we say OK ;
The database data appears to be healthy;
The import process was completed successfully . However, we need to configure some compatibility settings so that our Server Files can connect to the database .
If you have completed the ODBC source compatibility process mentioned above , now we will navigate to the /1886 Server Files/Files folder;
We open the LogInServer.ini file with a text editor;
We replace the URL and Server_00 fields with our server's IP address, and if desired, we can also edit the marked sections according to our needs, then save;
We start the LogInServer application by double-clicking it ;
We start AIServer by double-clicking it ;
We open the GameServer.ini file, change the IP addresses to match our server IP addresses, and save it;
We are running the GameServer application;
Knight Online 1886 Server Files were successfully run.
Let's assume we've downloaded the client file to our personal computer. To connect to our Knight Online server from our personal computer, we open the Server.ini file located under the /1886 Seamless Client/ folder ;
We are changing the IP address to our own server IP address and saving it;
We run the KnightOnLine.exe application from our personal computer ;
If it asks for a username and password;
username: kn_online
Password: ko123
We connect directly to our installed server;
Here are some screenshots:
Hidden text: Cannot be quoted.
niceSetting Up a Knight Online PvP Server on Windows
You can easily set up a Knight Online private server on your Windows-based servers (such as Windows 7, 8, Server 2008 , etc.). As the responsible parties, we deemed it appropriate to provide this explanation for you and our customers. Knight Online, by its nature, consumes less processor power than Metin2-type systems. However, RAM consumption is similar. For these reasons, we recommend starting with a server with a minimum of 2 GB of RAM.
After downloading the Knight Online server files installation file, don't forget to extract it from the RAR archive!
:::::::::::::::: SETUP ::::::::::::::::
We open the application by going to Start -> Programs -> Microsoft SQL Server 2008 (R2) -> SQL Server Management Studio ;
We connect to the SQL server by clicking Connect ;
We click on Databases -> New Database ;
We enter "Database name: kn_online " and click OK ;
Inside the folder containing the downloaded rar file, navigate to the folder named /1886 Server Files . There, double-click on Auto-odbc ;
Yes, we say;
Okay, we say;
Next, we create a folder named /1886 database under the C: drive and paste db.bak into it;
We reopen SQL Server Management Studio and click on kn_online -> Tasks -> Restore -> Database ;
We select "From device" and click on the marked area;
We say Add ;
We select db.bak from the /1886 database folder under C: and click OK ;
Okay, we say;
We select the area under Restore ;
From the left menu, click Options , select Overwrite the existing database, and click OK .
The transfer process is complete , we say OK ;
The database data appears to be healthy;
The import process was completed successfully . However, we need to configure some compatibility settings so that our Server Files can connect to the database .
If you have completed the ODBC source compatibility process mentioned above , now we will navigate to the /1886 Server Files/Files folder;
We open the LogInServer.ini file with a text editor;
We replace the URL and Server_00 fields with our server's IP address, and if desired, we can also edit the marked sections according to our needs, then save;
We start the LogInServer application by double-clicking it ;
We start AIServer by double-clicking it ;
We open the GameServer.ini file, change the IP addresses to match our server IP addresses, and save it;
We are running the GameServer application;
Knight Online 1886 Server Files were successfully run.
Let's assume we've downloaded the client file to our personal computer. To connect to our Knight Online server from our personal computer, we open the Server.ini file located under the /1886 Seamless Client/ folder ;
We are changing the IP address to our own server IP address and saving it;
We run the KnightOnLine.exe application from our personal computer ;
If it asks for a username and password;
username: kn_online
Password: ko123
We connect directly to our installed server;
Here are some screenshots:
Hidden text: Cannot be quoted.
Setting Up a Knight Online PvP Server on Windows
You can easily set up a Knight Online private server on your Windows-based servers (such as Windows 7, 8, Server 2008 , etc.). As the responsible parties, we deemed it appropriate to provide this explanation for you and our customers. Knight Online, by its nature, consumes less processor power than Metin2-type systems. However, RAM consumption is similar. For these reasons, we recommend starting with a server with a minimum of 2 GB of RAM.
After downloading the Knight Online server files installation file, don't forget to extract it from the RAR archive!
:::::::::::::::: SETUP ::::::::::::::::
We open the application by going to Start -> Programs -> Microsoft SQL Server 2008 (R2) -> SQL Server Management Studio ;
We connect to the SQL server by clicking Connect ;
We click on Databases -> New Database ;
We enter "Database name: kn_online " and click OK ;
Inside the folder containing the downloaded rar file, navigate to the folder named /1886 Server Files . There, double-click on Auto-odbc ;
Yes, we say;
Okay, we say;
Next, we create a folder named /1886 database under the C: drive and paste db.bak into it;
We reopen SQL Server Management Studio and click on kn_online -> Tasks -> Restore -> Database ;
We select "From device" and click on the marked area;
We say Add ;
We select db.bak from the /1886 database folder under C: and click OK ;
Okay, we say;
We select the area under Restore ;
From the left menu, click Options , select Overwrite the existing database, and click OK .
The transfer process is complete , we say OK ;
The database data appears healthy;
The import process was completed successfully . However, we need to configure some compatibility settings so that our Server Files can connect to the database .
If you have completed the ODBC source compatibility process mentioned above , now we will navigate to the /1886 Server Files/Files folder;
We open the LogInServer.ini file with a text editor;
We replace the URL and Server_00 fields with our server's IP address, and if desired, we can also edit the marked sections according to our needs, then save;
We start the LogInServer application by double-clicking it ;
We start AIServer by double-clicking it ;
We open the GameServer.ini file, change the IP addresses to match our server IP addresses, and save it;
We are running the GameServer application;
Knight Online 1886 Server Files were successfully run.
Let's assume we've downloaded the client file to our personal computer. To connect to our Knight Online server from our personal computer, we open the Server.ini file located under the /1886 Seamless Client/ folder ;
We are changing the IP address to our own server IP address and saving it;
We run the KnightOnLine.exe application from our personal computer ;
If it asks for a username and password;
username: kn_online
Password: ko123
We connect directly to our installed server;
Here are some screenshots:
Hidden text: Cannot be quoted.
jd job manSetting Up a Knight Online PvP Server on Windows
You can easily set up a Knight Online private server on your Windows-based servers (such as Windows 7, 8, Server 2008 , etc.). As the responsible parties, we deemed it appropriate to provide this explanation for you and our customers. Knight Online, by its nature, consumes less processor power than Metin2-type systems. However, RAM consumption is similar. For these reasons, we recommend starting with a server with a minimum of 2 GB of RAM.
After downloading the Knight Online server files installation file, don't forget to extract it from the RAR archive!
:::::::::::::::: SETUP ::::::::::::::::
We open the application by going to Start -> Programs -> Microsoft SQL Server 2008 (R2) -> SQL Server Management Studio ;
We connect to the SQL server by clicking Connect ;
We click on Databases -> New Database ;
We enter "Database name: kn_online " and click OK ;
Inside the folder containing the downloaded rar file, navigate to the folder named /1886 Server Files . There, double-click on Auto-odbc ;
Yes, we say;
Okay, we say;
Next, we create a folder named /1886 database under the C: drive and paste db.bak into it;
We reopen SQL Server Management Studio and click on kn_online -> Tasks -> Restore -> Database ;
We select "From device" and click on the marked area;
We say Add ;
We select db.bak from the /1886 database folder under C: and click OK ;
Okay, we say;
We select the area under Restore ;
From the left menu, click Options , select Overwrite the existing database, and click OK .
The transfer process is complete , we say OK ;
The database data appears to be healthy;
The import process was completed successfully . However, we need to configure some compatibility settings so that our Server Files can connect to the database .
If you have completed the ODBC source compatibility process mentioned above , now we will navigate to the /1886 Server Files/Files folder;
We open the LogInServer.ini file with a text editor;
We replace the URL and Server_00 fields with our server's IP address, and if desired, we can also edit the marked sections according to our needs, then save;
We start the LogInServer application by double-clicking it ;
We start AIServer by double-clicking it ;
We open the GameServer.ini file, change the IP addresses to match our server IP addresses, and save it;
We are running the GameServer application;
Knight Online 1886 Server Files were successfully run.
Let's assume we've downloaded the client file to our personal computer. To connect to our Knight Online server from our personal computer, we open the Server.ini file located under the /1886 Seamless Client/ folder ;
We are changing the IP address to our own server IP address and saving it;
We run the KnightOnLine.exe application from our personal computer ;
If it asks for a username and password;
username: kn_online
Password: ko123
We connect directly to our installed server;
Here are some screenshots:
Hidden text: Cannot be quoted.
Setting Up a Knight Online PvP Server on Windows
You can easily set up a Knight Online private server on your Windows-based servers (such as Windows 7, 8, Server 2008 , etc.). As the responsible parties, we deemed it appropriate to provide this explanation for you and our customers. Knight Online, by its nature, consumes less processor power than Metin2-type systems. However, RAM consumption is similar. For these reasons, we recommend starting with a server with a minimum of 2 GB of RAM.
After downloading the Knight Online server files installation file, don't forget to extract it from the RAR archive!
:::::::::::::::: SETUP ::::::::::::::::
We open the application by going to Start -> Programs -> Microsoft SQL Server 2008 (R2) -> SQL Server Management Studio ;
We connect to the SQL server by clicking Connect ;
We click on Databases -> New Database ;
We enter "Database name: kn_online " and click OK ;
Inside the folder containing the downloaded rar file, navigate to the folder named /1886 Server Files . There, double-click on Auto-odbc ;
Yes, we say;
Okay, we say;
Next, we create a folder named /1886 database under the C: drive and paste db.bak into it;
We reopen SQL Server Management Studio and click on kn_online -> Tasks -> Restore -> Database ;
We select "From device" and click on the marked area;
We say Add ;
We select db.bak from the /1886 database folder under C: and click OK ;
Okay, we say;
We select the area under Restore ;
From the left menu, click Options , select Overwrite the existing database, and click OK .
The transfer process is complete , we say OK ;
The database data appears healthy;
The import process was completed successfully . However, we need to configure some compatibility settings so that our Server Files can connect to the database .
If you have completed the ODBC source compatibility process mentioned above , now we will navigate to the /1886 Server Files/Files folder;
We open the LogInServer.ini file with a text editor;
We replace the URL and Server_00 fields with our server's IP address, and if desired, we can also edit the marked sections according to our needs, then save;
We start the LogInServer application by double-clicking it ;
We start AIServer by double-clicking it ;
We open the GameServer.ini file, change the IP addresses to match our server IP addresses, and save it;
We are running the GameServer application;
Knight Online 1886 Server Files were successfully run.
Let's assume we've downloaded the client file to our personal computer. To connect to our Knight Online server from our personal computer, we open the Server.ini file located under the /1886 Seamless Client/ folder ;
We are changing the IP address to our own server IP address and saving it;
We run the KnightOnLine.exe application from our personal computer ;
If it asks for a username and password;
username: kn_online
Password: ko123
We connect directly to our installed server;
Here are some screenshots:
Hidden text: Cannot be quoted.